Sunday 28 February 2010

fairy cakes

Before the invasion of the cupcake we had fairy cakes and I love baking them and setting them out on my cake stand for Sunday tea. 


So my final piece for Wendy using the Crafty Secrets Fairyland stamps just had to be a cake!


I used my Hot of the Press cupcake template again after decorating some watercolour paper with my distress inks and stamped images.


I added stamped images to the paper case, including this ladybird who I just think is sooooooo cute, wandering off to fairyland wearing his walking stick and top hat!


The fairy is attached to the flower on the top of the cake which can be lifted off in order to open the box and see what goodies are inside!  And the little cake tag is part of the template too!

This little fairy will be winging her way to Wendy at The Stamp Attic tomorrow, along with this:


which you're only getting a sneak peek of cos it's for Wendy, and I want her to see it in the 'flesh' first :)

Thursday 25 February 2010

pdcc time again? where did the week go?


I'm sure the weeks go faster in February!  Not that I mind the Play Date Challenges coming round, and especially not this week.  Julie's introduced the idea of a 'colour splash'... black and white with a splash of colour.  And this week's colour is one of my favourites - teal :)  I love the contrast of black and white against a colour (or vice versa) so this is right up my street. 

Julie did the challenge graphic all by herself this week..didn't she do a great job for her first time using Photoshop!  That program just seems like gobbeldygook to me, so I'm really proud of her.


I found this black and white fabric whilst at a Quilt Exhibition at the weekend and after seeing some owls similar to this one decided I had to design my own! 


He's a little tiny owl, but full of character.


And he seems to be happy in the trees in my garden ;)

Saturday 20 February 2010

Inspired by ... [hang on, wasn't that yesterday?]

Sue Roddis and her Stampotique stamps!


Sue brought some of the latest Stampotique stamps with her yesterday [she's on their design team].  How cool is that!!!  Now those of you who know Sue will know she loves these images, and anything halloweeny.  My collection of Stampotique stamps lean to the cuter end.  We didn't have much time to play with them whilst Sue was with us, so we stamped a few up on white paper.


Sue has a bit of a drive to get home from mine so yesterday, Helen and I still had some playtime before tea after Sue had gone! So we carried on playing in our journals.  How fab are those heads?


My pages were already coloured, and the blue one was stamped.  The door, cat, angel, heads and odd bloke are all part of the new Stampotique release.  Wendy at The Stamp Attic has got the new release on order and they should be in soon [EDIT: Wendy's expecting them March 6th but you can pre-order them from her HERE].

another journal page


My journal has blank pages, some pages just coloured, and others with varying amounts of stamping and imagery on them.  Of course, it also has some finished pages LOL!  Anyway, this was a page I shared a while back but couldn't think what to write on back then.  The perfect quote was said to me the other week so I've now added it to my journal.  I really must get into the habit of dating my pieces though!

Friday 19 February 2010

Inspired by ...

Diana Trout!

For this week's play date, Sue, Helen and I decided to use one of my journalling books for inspiration, and I chose 'Journalling Spilling' by Diana Trout.  I love her splashy, painty way of journalling.  We started by watching one of her art journalling youtube videos:


Then we got out a selection of collage papers and paints


and obediently picked out both paper and paint randomly,


ending up using colour combos we really wouldn't have chosen.


I picked out two reds, a blue and black.  The hardest thing was not reaching for a rubber stamp to add pattern and texture.  I had to make my own with my paintbrush!


And my gel pen.  I love the small circles surrounding the larger one.  I also used a pearlescent paint to add highlights to the page as it was in danger of being too dark.


The words were found in the Radio Times..they seemed rather fitting!!!

Looking after our children at the same time as journalling meant I forgot to take pictures of us ... sorry!  If you missed our last 'inspired by' day, have a look here.

EDIT:  And head here to Sue's blog, Jabberwocky, to see her yummy pages; she's written on hers :)

Thursday 18 February 2010

roses are red, and daisies too in this week's Play Date Cafe Colour Challenge!


I have rather a lot of journals that need covers, so when it became apparent that these flowers weren't going to fit on a card,  I found a journal that was a perfect fit!   And being red, it fitted in great with this week's Play Date Cafe colours :)


Aren't they gorgeous?  So many options with this colour combo. 


I went for a bit of a grunge look.  The flower stamp is from the Autumn Leaves' Doodle Flowers set.  I stamped it onto text that I'd sprayed brown, mounted it on red card, and paper pieced the centre to include red dots and some grungy letters courtesy of Sir Tim.  I stitched around the flowers with my sewing machine, and added the leaves and stems.


I didn't intend this piece to come out as pretty as it did LOL but it needed something to the side of the main image and the bits n pieces I found brought about a rather prettier look.  Not that it matters!


And don't forget, the Play Date Cafe have a Design Team Call out 'til Feb 28th so still time to get your application in!  Click HERE for details,

Sunday 14 February 2010

happy valentine's day!


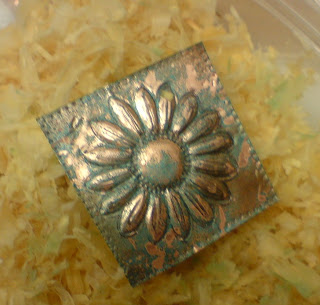
I taught a metal embossing workshop at Paddy's yesterday (rpt next Tues still has a couple of spaces if anyone's interested) so I just had to continue my theme for my valentine!  I heated the copper in the flame from my gas cooker to get the coloured effect:


One of the things I love about teaching workshops is that people go away sometimes with a new confidence in themselves.  Two people on the workshop had metal tools at home that they'd just had no success with.  They both went home thrilled with their pieces, and keen to carry on at home.


We worked on copper sheet which allowed us to colour the metal in a number of ways.  We had such a laugh 'aging' our copper with sawdust, vinegar and salt n vinegar crisps.  Sawdust and vinegar worked the best, how cool does Kate's flower look?


We used rubber stamps for the images on our books


Lynn's work already looks fabulous, but think how amazing this is going to be when it's covering the book...all that yummy texture!


Sue, Cynthia and Kate all had different themes


Sue's had a dragon theme, like Kate's, but on the back she used the Tanda stamps roof tile image to represent scales!  Cynthia went for a heart theme.  The Elusive Images heart just looks amazing in copper, as do the keys and locks that Kate used.


Sue and Cynthia did work some more color into their books after I took these photos.  Sue was especially thrilled to be taking home a completed project!!


Kate took hers home to colour with promarkers so she could be more precise with applying colour to her piece.


This metal book definitely brought out the dragon lovers in our group!  Freema embossed a beautiful tree on the other side of her book...

[apols for photo quality]

Having noticed that Ten Seconds Studio had brought out a gears embossing plate at CHA 2010, I wondered how well Tim's gears would emboss.  I love how Sue used this idea to create 'leaves' on the tree her owl is sitting on.  I'd watch her blog for more pics of this yummy book, I suspect it wil have had more additions once it got home!

Friday 12 February 2010

another fun art journalling workshop at Paddy's


I find it really hard to remember to take photos during workshops.  I'm too distracted...teaching!!! :)  It wasn't until I moved to sit opposite Paddy at the end of the day and spotted a photo opportunity that I remembered!  We were a small group as we'd had a couple of cancellations, and Helen had had to leave to collect her children, but here are a few pictures of the day.


Sylvia's done this workshop before but used a tiny weeny book to work in.  She's filled a couple of them so Paddy challenged her to work on a larger size (8x8).  What a difference in confidence since the first class she did.  And her backgrounds are amazing (check out the piece of card next to the pink heat gun; I encourage everyone to wipe off their brush, stencil, sponge.. on it, and stamp off any remaining ink from their stamps.  It produces a wonderful collaged piece which can be cut up and used in your journal)...


I love the peach tones with the teal here, colours I wouldn't normally choose but LOVE so will be choosing them for a journal page soon!


Sylvia has a corner shop so had to nip out at lunchtime and 'hometime' (school) to tend to it.


Sue thoroughly enjoyed her day with us.  She wanted to be free-er in her artwork (something I aim for too!) and had a great time laying down colours for her backgrounds before working on a few pages with images. Sorry, I forgot to take those pics!!

I made a few pages up whilst demoing various painting techniques.  Non finished yet; some I have plans for, others will be there when I need them! 


[note to self, colour seeps through cartridge paper when you make it very wet!]


Sue shared a rhyme with us when we were discussing colour so I decided to start some journal pages around that theme...

blue and green
should never be seen
except with something in between

red and green
should never be seen
except upon a donkey!!! :)

Thursday 11 February 2010

Julie Ranae brings us challenge #16

from the Play Date Cafe!

And just look at those yummy red jelly beans :)  I wonder what flavour they are!


I must have had sweet treats on the brain whilst creating my project this week.  Whilst struggling to find 'lavender' as opposed to any of the violets I had in my heap of paper and card, I came across my 3d cupcake template by Hot of the Press which I bought last year from Wendy at The Stamp Attic.


I can see myself making more of these cupcakes :)  Especially now I can fold the top piece LOL.  I had to watch the video tute to work it out [http://www.paperwishes.com/webisodes/?page=high&id=186].


The flower is by prima and I added icicle Stickles around the edge of the paper shape before folding.  I raided my drawer of shinies to decorate the cupcake case, adding the splash of red I needed to complete the challenge.


LinkWithin

Related Posts with Thumbnails