Friday 27 June 2014

Happy Birthday!


My little girl was 17 this week and as she's just finished a dance show Hazel dancing was the perfect image!


I used one of my new stamps 'Baroque background' for the grass, and Janet's lovely clouds cover up all the black smudges I can't help but add to my cards!!!


A few sparkles in the daisies and I was happy with my card.  Sorry for the short post, it's sheer madness at work at the moment!


Stampotique Stamps Used:

Friday 20 June 2014

simple pleasures

I'm back at work after my op and this is a majorly busy time in school so just a quick card from me today!!


The bicycle and bikeride text are both from Janet Klein's new collection.  Aren't they gorgeous?!


I added extra flowers to the basket (I hope Janet doesn't mind!) by stamping them on more card and cutting them out.  There's some sparkles in there too!


Stampotique stamps used:

Friday 13 June 2014

Stampotique mail art


This week I joined in Roc Nicholas' mail art swap on Facebook.  I love using the inside of envelopes for the patterned paper but it really surprised me how much of my mail looks the same from the outside - there's hardly any variation in text!


I used one of the boring envelopes as a template, drew round it and added ink through lots of stencils.  I stamped 'dog' on the bits of the envelope that had text on and placed them in a row.  Roc's top tip before posting is to coat the envelope with gel medium to protect it.  I was very glad I did this as it was absolutely throwing it down when I went out to the post office.  However, it did pick up the blue dylusions ink and made the dogs slightly blue - oops!!


I enjoyed making the envelope so much I decided to make another.  This has some added extras and features over on the Stampotique Designers' blog today.

Stampotique stamps used:

Monday 9 June 2014

beaded envelope with a sprinkle of fairy dust

This month's Lavinia Stamps Challenge is 'add some beads or gems' and since I usually add some kind of sparkle to any card I make using Tracey's gorgeous stamps I decided to add some beads.


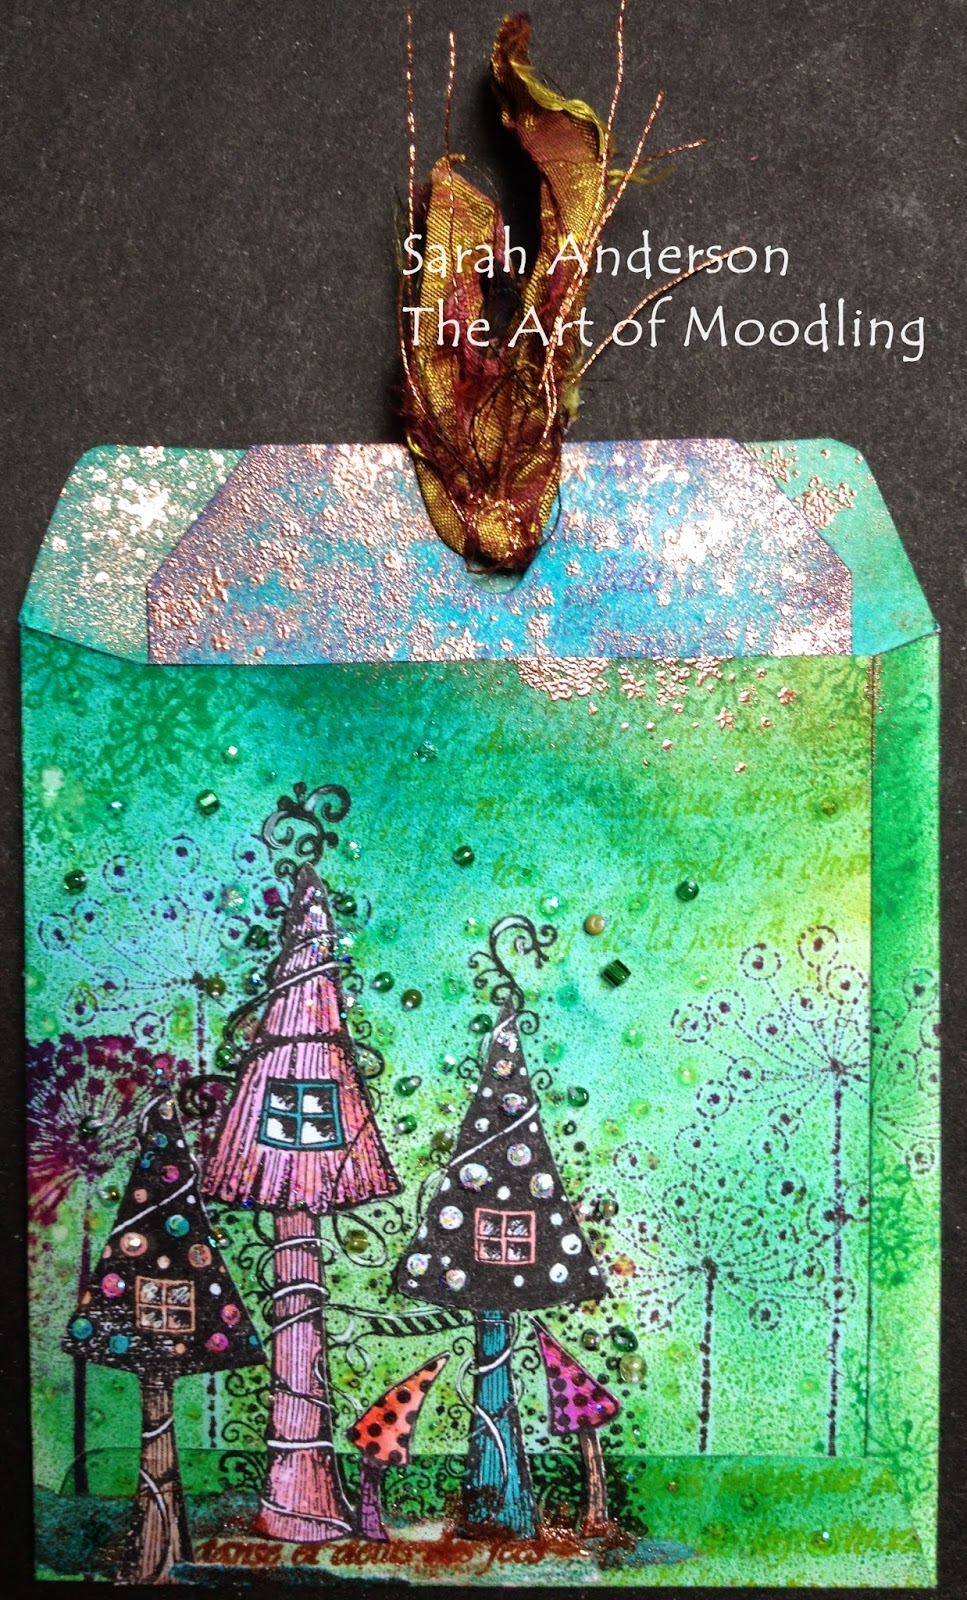
I was originally going to make a card with a beaded edging but I enjoyed making my envelopes so much yesterday I made another and added beads for texture around the toadstool houses.


Starting with my gelli plate I laid the opened out envelope (my template) underneath so I could see the area I needed to ink, and to help image placement.


You can just about see the ink I brayered on and the stamped images.


I picked up the second lot of colour onto what will be the back of the envelope, then realised I'd done it all backwards so started again, turning the envelope template over under my gelli plate (I can now hear you all shouting at me but don't worry, I get there in the end!!).


Just as I lifted this second print I realised that the first one was fine, it's an envelope, it doesn't matter which side the flaps go to fasten it!!  Duh!!!  Never mind, I now have two lol.  I drew around the brown envelope, cut it and folded it and then forgot to take anymore step by step photos - sorry!!


 I stitched the beads onto the envelope before I attached it altogether (glad at least a tiny portion of my brain was working!!).  Love that bronze embossing powder I found in my drawer ;)


The toadstools were stamped onto the envelope in order to get the fine detail around them, but I stamped and coloured them again on separate card to give them more definition and to cover up the line created by stamping over the flap at the base of the envelope.


The envelope was looking a little empty so I made a tag with a sequinned flower (when I tried this on the envelope it was too much with the beads but I really liked the idea!!)


They don't show up well with the camera but the sequins are two shades of pink and orange.


 Still loving that bronze embossing powder!!


I think it still needs some more tags inside but I'm happy with what I've done so far.


Sunday 8 June 2014

another Paper Artsy challenge piece

I knew I wouldn't be able to resist playing with these stamps for long but that was hardly any time at all!!  So here I am, back with a second entry for Paper Artsy's weekly challenge


I often decorate envelopes but this time I was inspired by Darcy to create an envelope from the papers I made earlier (see the previous post).  I opened up an envelope, glued it to the bag of my paper then refolded it.

  
I knew the stamped image would be difficult as I was stamping it overlapping card but it coped better than I thought!  I added a black and white image of the lady over the top.


Unlike Darcy I kept the flap at the top of the envelope (although I will give hers a go at some point), and added some of my left over bits of stamping from the previous project.  The tag in this Lynne Perella set was a perfect size to fit inside my envelope .... and hey presto, two projects in one day #feeling happier :)

a tag for the paper artsy weekly challenge


It's been a loooooong while since I entered a challenge but I needed a bit of cheering up [in my head I was going to be well enough to go back to work tomorrow but my body has decided it's not fit enough yet so I'm not :(  ]  I saw Helen's lovely cards on her blog and decided that this week's paper artsy challenge would be just the thing to make me feel better.


It was also the ooomph I needed to finally open the packet and use my Lynne Perella stamps!!  I have looked, and looked, and looked at these so often as I really love the imagery; finally bought a set at Happy Stampers earlier this year; and now I've managed to use them!  So thankyou paper artsy team for the inspiration I needed :)  I also cracked open my poor neglected distress inks, and very rarely used distress stains.


Whilst happily clapping handfuls of water over my inked papers (just LoVe that technique!!) I thought it might be fun to have splashes of ink on there too so I put some vintage photo distress stain in my hand (I'm sure re-inker would work too but I don't have any) with some water, again merrily clapped over the papers and yes, I like the result!


Being such a huge stencil fan I happily didn't have a problem finding any to co-ordinate with the stamps :)


I used a crafters workshop brocade combined with memory box flourish and clearsnap quarter foil.


 The lace stamp is one I've had for years from paperbag studios.


I felt the image needed grounding a bit more so used the top of the tag stamp as another border along the side.  I then felt it needed something 'extra' so I stamped it on white paper and layered it again over the top.


I have used bleach in the past, wasn't going too here then decided why not?  Just give it a go!!  My stazon inkpads were very dry so I tried it with my versafine black inkpad and it worked - YaY :)  I then worked back into the face, as Liesbeth suggests, with pencil crayons. I added highlights with both a white gel pen and a white pencil but felt like I overdid it on the eyes so went over them again with an inky sponge and then a coloured pencil.  I'm happier with them now although the difference doesn't seem to show up here.


 I stamped the cotton ribbon with the text section of stamp, although it's not very clear on the pics, sorry!


I will definitely be playing with these stamps again very soon.  Thanks again Liesbeth for the inspiration I needed :)  Her leporella accordion book is delightful and certainly worth a look if you've not seen it.

Friday 6 June 2014

horse on a tag


I ordered some new stamps direct from Stampotique and they arrived a few days ago ..


... definitely a happy parcel!  These are stamps I haven't been able to get hold of in the UK, otherwise I would support a 'local' stamp store.  The ones I know of here that stock Stampotique are a sprinkle of imagination, art from the heart, the cubby hole and the stamp attic.


I had a play with my distress inks the yesterday; I'd forgotten how vivid the colours were!  So when I wanted a strong green background for my lovely pink yummy horse I got them out.  This was made easier by the fact that just after my op, when I couldn't move much, I labelled them all and organised them into colours :)


I also made the background that I stamped 'horse' on using distress, this time the minis.  I followed Tim's June 2014 tag technique of inking up the back of a stencil (I used Tim Holtz' doily layering stencil), spraying it with water then stamping with it.  Once it was dry I stamped 'horse' over the top and cut him out.


I love finding random sentences in old books and I decided this one fitted 'horse' perfectly!  I made another tag using horse, which you can see over on the Stampotique Designers Blog.

Stampotique stamps used:

LinkWithin

Related Posts with Thumbnails